Connecting to EC2 via SSM from your Local Terminal
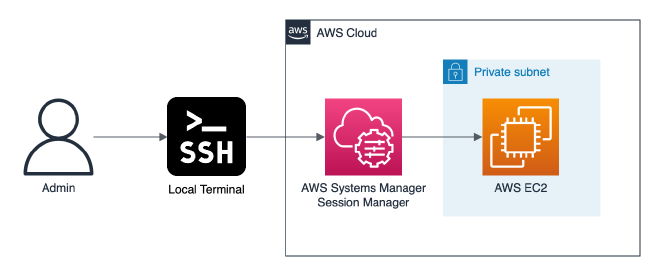
Table of Contents
In this guide we’re gonna explore how to SSH tunnel through AWS Systems Manager (SSM) to access private VPC resources, e.g. an EC2 bastion host.
Prerequisites #
- Deployed EC2 Instance with SSM enabled
- Depending on your OS: Terminal, PowerShell, Command shell
- AWS CLI with access key
- Session Manager plugin for AWS CLI
- OpenSSH (preinstalled on most OS)
- SSH key pair
Depending on your setup, it wildly differs how you properly deploy your EC2 instance. For this example, I’m using a Terraform module provided by Flaconi. Check their example directory for getting up to speed.
Intro: AWS System Manager #
AWS Systems Manager Session Manager uses the Systems Manager infrastructure to create an SSH-like session with an instance. Session Manager tunnels real SSH connections, allowing you to tunnel to another resource within your virtual private cloud (VPC) directly from your local machine. A managed instance that you create acts as a bastion host, or gateway, to your AWS resources. The benefits of this configuration are:
- Increased Security: This configuration uses only one Amazon Elastic Compute Cloud (Amazon EC2) instance (the bastion host), and connects outbound port 443 to Systems Manager infrastructure. This allows you to use Session Manager without any inbound connections. The local resource must allow inbound traffic only from the instance acting as bastion host. Therefore, there is no need to open any inbound rule publicly.
- Ease of use: You can access resources in your private VPC directly from your local machine.
Register your Public Key #
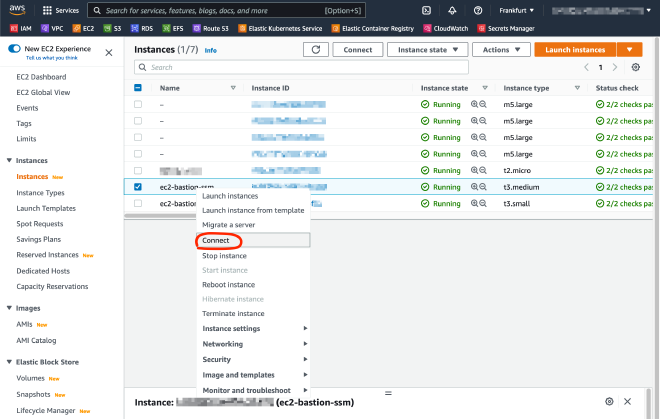
Supposing you already generated your SSH key pair with ssh-keygen, you have to place your public key into ~/.ssh/autorized_keys on the relevant EC2 host. In our case, we initially do that by connecting via the browser based Session Manager:
Navigate to EC2, right-click the bastion host and hit “Connect”:
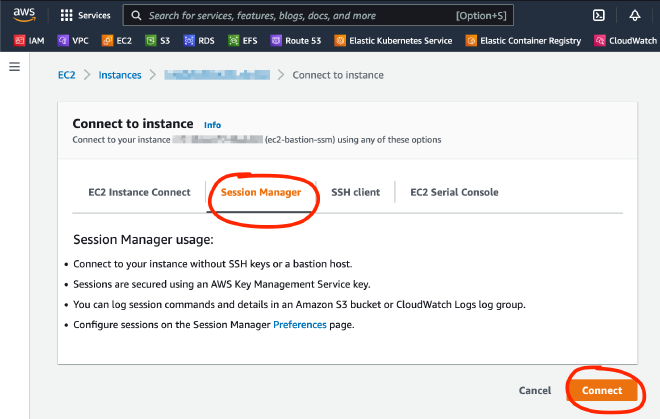
Use the Session Manager to connect to the bastion host:


If you run into any issue connecting via Session Manager, try following the AWS troubleshooting:
- https://docs.aws.amazon.com/systems-manager/latest/userguide/session-manager-troubleshooting.html
- https://aws.amazon.com/premiumsupport/knowledge-center/ssm-session-manager-connect-fail/
After you connected, change user and append your SSH public key (for macOS users: cat ~/.ssh/id_rsa.pub | pbcopy) to authorized_keys:
# change to default EC2 user
sudo -u ec2-user sh

# use your favorite terminal editor & paste in your SSH public key
vim /home/ec2-user/.ssh/authorized_keys
Great, you are now ready to configure your local SSH connection.
Configuring SSH locally #
Open your local SHH config (~/.ssh/config) and add a configuration block for your new connection:
ProxyCommandHost ec2-bastion
User ec2-user
IdentityFile ~/.ssh/id_rsa
ProxyCommand sh -c "aws ssm start-session --target i-XXXXXXXXXXXXXXXX --document-name AWS-StartSSHSession --parameters 'portNumber=%p' --region eu-central-1"
The Host ec2-bastion names the host we connect to later via SSH. User defines the linux user ec2-user on the host. Obviously, if you want to connect via a different user, configure it accordingly.
The IdentityFile sets the path to the private key. ProxyCommand calls the SSM plugin: it starts a port forwarding session with the instance id of the target bastion host.
If you set up everything correctly, you can now connect locally with the command:
ssh ec2-bastion
And now your SSH connection should be initiated via SSM from your local terminal! 🎉
In the next post, we’re gonna explore how to utilize this existing bastion host to proxy into a RDS instance in a private subnet.